

Hopefully, this will be this first of many projects I get to work on, but I have a feeling my pesky college education will get in the way. So, since I'm on a break tween semesters and have a little free time, I may as well make hay while the sun shines.
So, Herman Miller, like the dipshits they are, made a whole shitload of Eames armshells with wide mounts. This, of course, is unacceptable because you cannot put the iconic Eiffel, Rocker, etc... bases on the wide mount chairs. The only 2 choices you have are; cry, or remedy the situation. I chose the latter.
So, to get started, I removed the original mounts. The first few came off pretty easily by just tightening the screw down until it puts enough tension on the mount that the little bastard just pops off. However, the final mount I chose to remove with a chisel and a hammer, and I must say I was very pleased with the outcome.
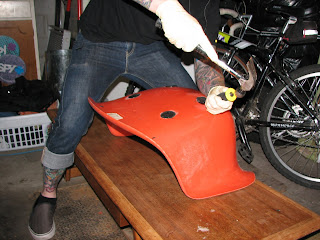
After getting the mounts off, the remaining epoxy needs to be chipped and sanded away. I was able to get the bigger pieces of epoxy off with the chisel, but most of it needed to be removed by sanding. You can sand the remaining bulk of epoxy by hand, but I chose to use my friend the pneumatic sander.


I used 120 grit sticky paper on the sander and tried to keep the sander at about a 45 degree angle. Sadly, I did manage to rut out the surface a bit by digging in a little too deep with the sander, but it's nothing that can't be fixed with some follow on hand sanding, which I did with 80 grit.

The 80 grit does a great job of smoothing out the surface where the old mounts were, however, the original mount on this chair has some pitting that I don't think I'm going to repair, mainly because once I sand the entire chair down and cover it in Penetrol, the pitting will be barely noticeable. Besides, a little wear adds to the character of these iconic pieces. I managed to remove the back two mounts and sand down the back narrow mount surfaces in preparation for the new mount installation. I still need to remove the epoxy from the front mounts, and I need to get ahold of 3M to determine the ideal adhesive for this application. Here's a nice little shot of where I've gotten so far.

I'm not sure what I want to do about the original sticker in the lower center of the image. This is a really cool thing to keep, but since I've already modified this chair, it's no longer original, so having the original sticker isn't going to do much for resale (not that I would sale this beautiful bitch). Eh, we'll see when I get around to refinishing.
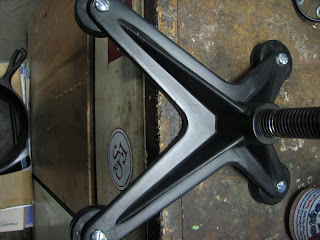
Once I got all of the remaining epoxy off, it was time to line up the mounts in their new homes. The best way, so I'm told, is to use a nice heavy base, attach your new mounts to the base, and use a sharpie to line mark the mount positions. Then, I decided to verify that the mount positions on the base I was using would match the positions on the new base. After I got that sorted, I placed the mounts on the new base and used that as my template. After measure twice (times 3 or 4) it was time to commit.


After some back and forth correspondence with 3m, they recommended this 2-part epoxy...

DP605NS (off white)
Which cost about $16 at Industrial Supply in SLC. This is a bit more expensive than the JB Kwik Weld method used by many, but I wanted to try something a little different.
One thing to note is this epoxy is designed to be used with a application 'gun', which I did not want to spend another $?? on, so I pushed out the two parts evenly by hand, which was a bit of a pain, but worth not spending food money on. I premixed it, like aso

The trick is, to put a dollop of epoxy in the center of the marked position about the size of a quarter. Because this particular epoxy has a 5 minute work life, I could get pics of that part. After which point, you want to apply pressure on the mounts. You want excess epoxy to seep out from under the mounts, which is something you will notice on any original Eames fiberglass chair with rubber shockmounts.
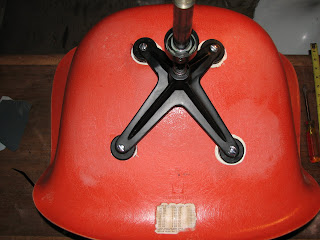
As seen here, three of the four mounts have a relatively even amount of epoxy visible after being pressed onto the chair. Sadly, I didn't get enough on the lower right mount.

After allowing the epoxy to cure for about 32 hours (which is more than necessary) I checked the adhesion. Everything looked and felt good, even the mount which didn't get the proper amount of epoxy. So, in the mean time, I will hold off on refinishing the surface and decide what I will do with that pesky fourth mount. I did mention this was my first time restoring one of these right? Good. Note, use at least 1/2 of the tube, if not more, when preparing for the mounting step.

Here she is in her current state, about 3 days after mounting the beautiful Modernica Rocker base, thanks to Ron at the ever impressive Green Ant on 3rd South, 2nd East in Salt Lake City, Utah.
(BTW, I didn't choose the color on the wall, that was my roomies : P)
No comments:
Post a Comment